Pup painting prep
When doing your own Pup Painting (or cat, but we won't tell them the name), the important part really lies in proper preparation. Unfortunately, I haven't taken any professional photos of the setup I typically do, but I'm happy to talk through the process and try to do a new photo-shoot in the future if there is a call for it.
Materials:
-
Canvas: I recommend a canvas board around 8x10 in size (too much smaller and you can't get good details in the portrait and any bigger and you can't fit it in a zip-lock bag).
-
Acrylic paints: which can be found in any craft store or online. I like a pack that gives you some variety in colors, that way you aren't trying to mix your own. If you only are doing one (or a few) Pup Paintings of your own, you really don't need a lot of paint and a set with small tubes but more variety can be more fun. Especially if you already have a color palette in mind.
-
Plastic bag: while a zip-lock can't close entirely over an 8x10 canvas board, it covers most of it
-
Duct tape: to seal what the bag can't cover and keep all the paint inside
-
Scissors: cleanable or a set you don't mind getting paint on
-
Enticement materials specific to your pet (explained below)


01
Pick your Main colors
Picking colors is very important. I recommend choosing a main color (e.g. green, blue, red) and then having a few variants from near-by on the color wheel to provide a nice palette. Such as going with Ultramarine Blue, Phthalo Blue, and Cerulean Blue as the main colors (keep in mind how dark some colors are natively and mix with white or other hues to brighten if needed).
Picking the colors themselves can be as easy as your favorite color, or something that reminds you of them. I went with blues for Biscuit because having done a lot of training together, I associated the blue sky with time with him. And the contrasting color reminded me of his fur. Kaleb is wearing a red color and his personality reminds me of fire. But I chose the two cats' color palettes based on their respective eye colors. Ari picked his color at the shelter himself! There isn't a wrong answer here.
02
Color contrasts
To really make the painting pop, a contrasting color works well. Not too many of them, or it gets muddy. I don't recommend a color directly opposite of the color wheel, but if your main colors are cool, choose a warm one, etc. Biscuit's color contrast was Yellow Ochre. And I threw in Silver metallic as well, to both blend and really give the painting a little pzazz.


03
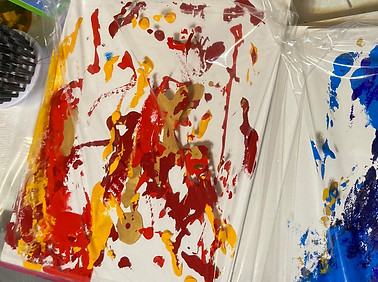
layout
Now, when laying out the colors on the canvas board, I like to keep in mind the fact that animals aren't going to exactly... mix them well. So bear that in mind and know that a good spread to start works much better. I try to go by the rule of 3 - try to put any one color on the canvas in at least 3 places. You don't need to be exact and just go with what looks nice to you.
Personally, I like to keep the colors individual in the step. Some people prefer to mix them before they place the canvas in the bag and then let the pet mix them further. There is no one "right" way. This is an activity for you and your pet!
04
Bagging
Before trying to slide the paint-prepped canvas into the bag, I shake the bag open as much as possible. I like to try and get the canvas in there with as little dragging across the plastic on my part as I can. I've gotten better, my first few attempts were... not great. But if it does drag, it just adds to the painting process really.
05
Taping
Don't forget! The top of the bag, even if you got it closed, needs to be sealed with duct tape. Or any other sort of more adhesive tape like moving tape or masking tape. I don't recommend scotch, obviously. I like duct tape as it's held up well through multiple pet tests for me.
06
enticing Enrichment
Okay, so this is a big one, and a section that might a stumbling block for some pet parents. Some people will have no problems getting their dog or cat to engage with the painting, and for some... it might take a bit more creative thinking. Here are some ideas that we've had so far, and be sure to tell us what worked for you!
Dogs
-
Number 1 pick for a really interactive treat is peanut butter smeared thinly on top of the bag. If they are usually into peanut butter but are showing signs of hesitation around the new thing (the bag), then try breaking up some really high value treats and pushing them into the peanut butter.
-
Other food can also be smeared on top of the bag, such as canned patte, tuna, pumpkin, mashed banana, etc. If you want to try and increase their licking time, try putting it on the bag ahead of time, and putting that in the freezer for half an hour or so to make it more stuck.
-
If your dog doesn't have super long nails, you might trying playing with them on top of the bag. This is at your own risk though. It might work.... it might go horribly wrong.
-
I had a client dip their dog's paws in the paint and use it to dab lots of paw prints all over the canvas. This is not recommended for most dogs, as thoroughly washing their paws afterwards is a MUST and you must ensure the paint is non-toxic ahead of time. However, if they won't engage with food or play around a strange new item, but will let you mess with their paws, it might be an option for you.
Cats
-
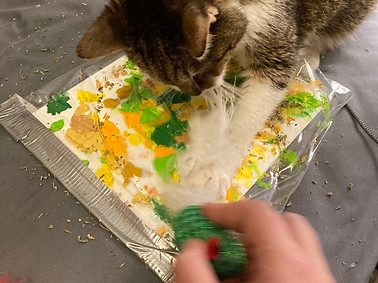
As you might expect, cats are a bit trickier. For the full 8x10 size canvas, I did not want to use a food item for my cats. I went a different route. I found that for one of my cats, sprinkling cat nip on top of the bag caused him to be very into it. He rolled all over the bag, painting his canvas quite well.
-
My other cat was not into the cat nip in the slightest. Instead, I engaged her in play on top of the canvas itself. Sometimes, I used the toy to kinda... drag her paws back and forth to help her paint a bit. But mostly, I got her to engage while the canvas was under her to get her to "paint".
-
Now, both of my cats are very senior kitties (17 years old) so a younger cat may be more into it or be more able to have a food option available to them.


07
Removing

Once everything is done and it's time to remove the painting from the bag, here's where you finally need those scissors. I like to cut the bag away from the painting to preserve as much of the pet's own work as possible. I cut all the non-taped sides (3) and then lift away the top of the bag and remove the painted board from the bag and discard it.
If you leave the painting in the bag for an extended period of time (hours), you may end up with some unwanted artifacts, such as the canvas pulling away from the board, imprints of the bag left in the paint, or partially dried paint sticking to the bag when it's lifted. It's recommended to remove the painting withing 15-30 minutes after the session is completed, though there is time to clean up if needed.
08
Contact Me!
And now it's time to dry and contact me! Once the canvas is fully dried overnight, we can arrange pickup and I'll get started on your pet's digital sketch for approval before drawing it directly on the painting you worked on together.
